I finally have a Halloween look! I absolutely love Halloween. Ever since I was a little kid, it has always been my favourite holiday. Candy is a nice perk, but I love playing dress-up more than anything!
I did this look yesterday to wear to a Halloween party where there were many black lights. The whole thing took about two hours in total. To do this look I used Kryolan's UV-Dayglow aquacolour in UV Pink. This product is sort of a pain to work with, because it is hard to make it look even. It may seem annoying at first, but this stuff is really worth it if you either want the most insanely bright Dayglow colour during the day, or a glowing face under black lights. I will give you a quick run-down of how I use them, in case you decide to try them out.
To use kryolan aquacolours, you dip a brush or sponge in some water and then into the product and swirl it around a bit to make it a pasty consistency. If it is too runny or thick it will end up patchy. You also need to make sure you get the colour buildup you want on each prt of the face before moving on, because you can't really go in later and add a second layer. This tends to just rub off your first layer! I have found that the easiest way to apply this is with a large flat foundation brush. I make this aquacolour a thick pasty consistency and then apply it in a thick layer with short dab/stroke motions. Then, once it was dry, I set it with the brightest pink blush in my BH Glamorous Blush Palette. I then contoured with a matte black eyeshadow by NYX in my temples and the hollows of my cheeks and blended it out with the darkest red in the Glamorous Blush Palette. When I was done it looked something like this:

Then I traced the circles around my eyes, filled them in completely with Sigma's eyeliner pencil in Boost and set that with a matte black eyeshadow from NYX. I also traced a skeleton nose hole on my nose and filled that in with boost, then set it with the same eyeshadow. After that, I took a NYX black liquid liner and drew flower petals around my black eye circles and started to draw designs on my face. At this point I needed to take a break to eat and drink something before I did my mouth. This is what it looked like then:

After my delicious dinner of spinach and bacon pasta, I continued with drawing designs on my face. When I thought it looked good enough, I took a lip brush and used that to clean up all the edges with the aquacolour. I then used a package of green gems in various sizes and glued them to my face with lash glue anywhere I wanted. I also took a flat liner brush and dipped that in water and made a much thinner consistency paste with the Kryolan Aquacolour. I ran that brush all along my lashes so that they would be hot pink too. This product is not technically meant for use around the eyes, so I am not necessarily recommending you do this, but I like to live dangerously.
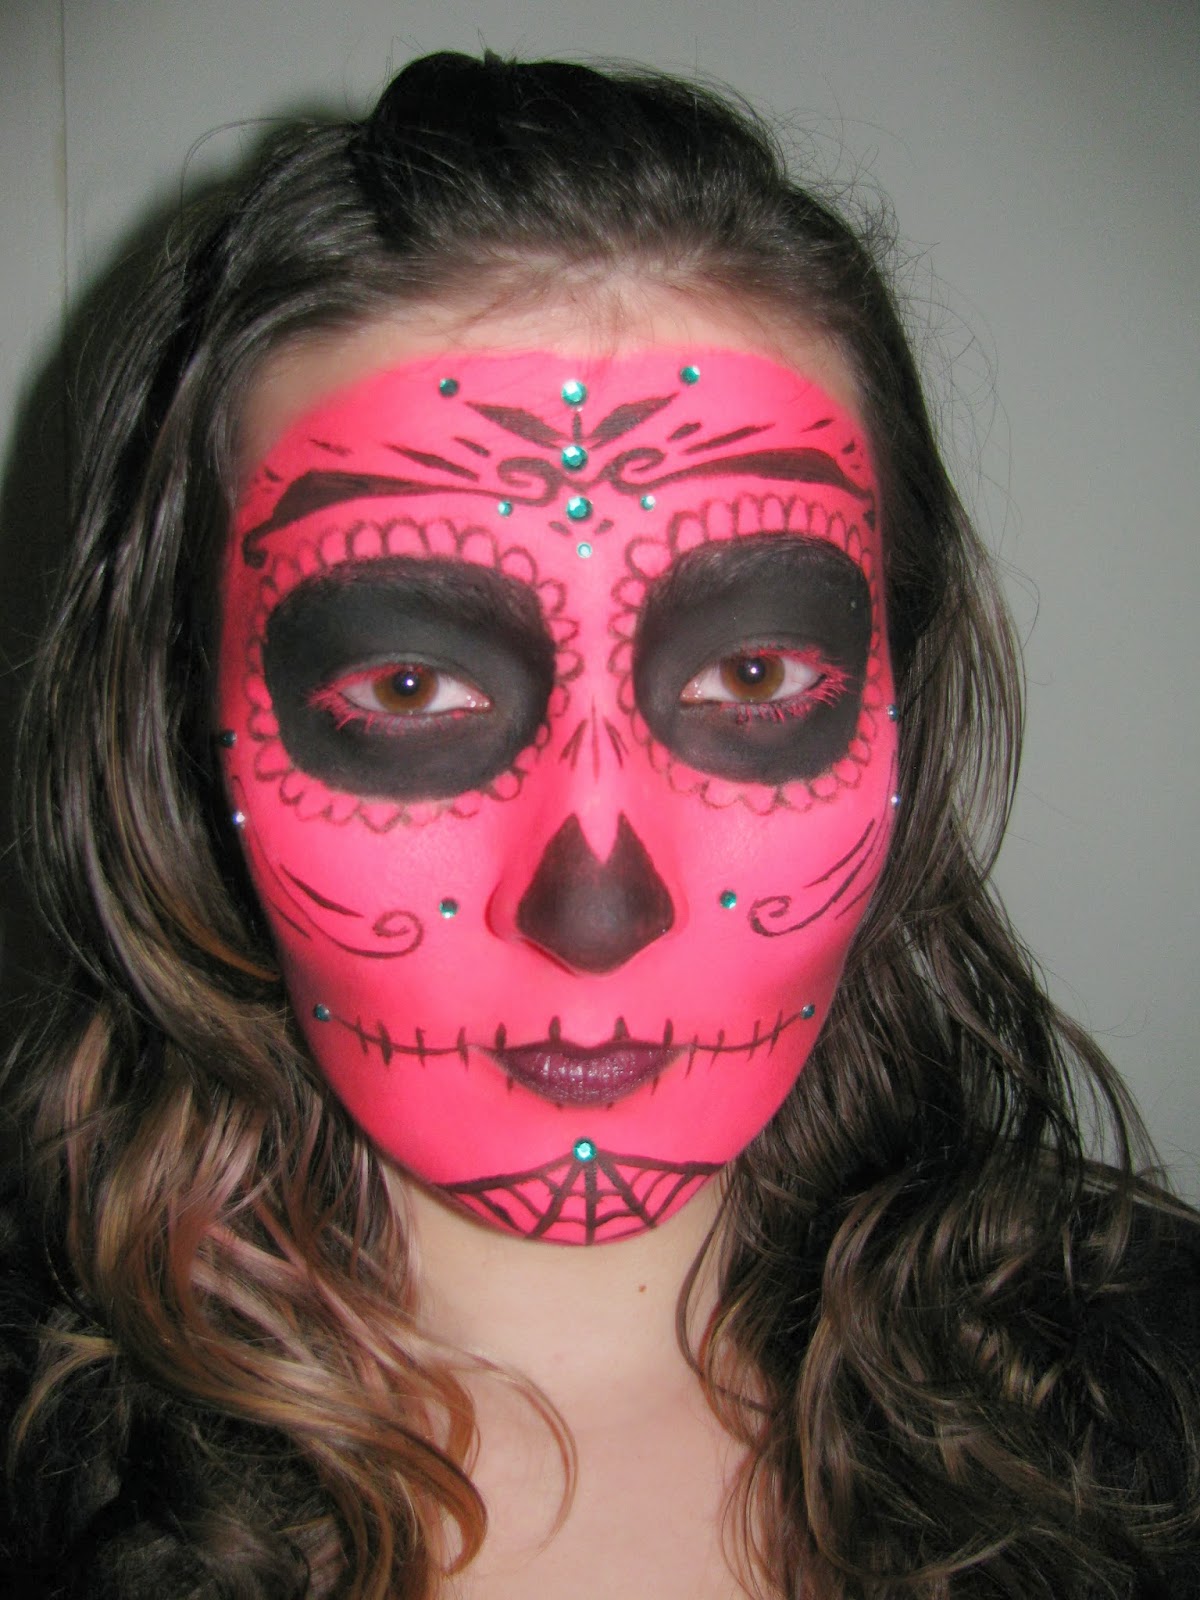
I did my lips last (in case I wanted a sip of anything). The teeth around my lips were done in liquid eyeliner but my lips were lined with Sigma's Boost liner and filled in with MAC's lipstick in Cyber. Two more gems on the outer corners of my new mouth and I was done. This was the finished product:


This look lasted a full 8 hours without looking very much worse at the end. This 8 hours included lots of dancing and minor amounts of sweating. It was just below freezing out last night and the doors and windows to the venue were all left open so the sweaty, dancy people wouldn't overheat. This was a bonus for me, but not so great for my friend who hates dancing and sat shivering all night. I took a picture of myself at some ridiculous hour in the morning just for you, to see how well it lasted:

As you can see, some of the makeup around my mouth and nose was wearing off and 3 of my rhinestones had fallen off. Some of the pink around my cheek area is also looking a little patchier as some sweat shows through. Other than that, I was surprised at how well this stayed on for such a highly water soluble product! I was most impressed, though, with how well Sigma's eyeliner pencil in Boost stayed on my eyelids with just a light wash of matte eyeshadow to set it. After the 8 hours, there was almost no creasing. I will definitely be trying this out as an eyeshadow base again in the future.
It took four cotton pads soaked in mineral oil plus some other scrubbing to get this all off of my face! Washing it all off was so heartbreaking! I wish I had managed to get pictures of it under black lights, but I forgot to bring my camera with me. I might post an update if I find anyone who was there who took pictures of me!
I hope you like my first Halloween tutorial! What are you going to be for Halloween this year? Let me know in the comments!
absolutely LOVE this, you did such a great job! I'd be heartbroken washing it all off too lol but at least you got some lovely pics of it :) x
ReplyDeleteThank you! This was really fun to do, glad you like it!
DeleteBeautiful, I love that bright pink and you did such a great job. You are going to look amazing for Halloween!
ReplyDeleteThanks for stopping by and commenting :) Visit any time!
-Erica
diaryofatrendaholic.com
Great halloween make up! If only i could do something like that! Seems difficult!Well done! New follower! :)
ReplyDeletehttp://justabitofall.blogspot.ch
Wow, this is so well done. Bet you had heaps of fun doing it too!
ReplyDeletehttp://beautyandlifestylehunter.blogspot.com.au
That's a great tutorial! I've always wanted to try the los muertos look, but never thought I could pull it off. Halloween is around the corner though.
ReplyDeletehttp://www.deareux.com
Wow, nice makeup! I like the pink base idea a lot. Great tutorial.
ReplyDeleteMakeup Demon blog
Makeup Demon Bloglovin