Sep 9, 2014
Life Update!
Hey guys!!! Very long time no see. Unfortunately a combination of broken laptops, internet issues and busy days has made it impossible for me to post here in months. I will hopefully be back to my regularly scheduled programming soon though! I have really missed blogging and can't wait to get back to it.
I did want to let you all know that I am living in BC for the rest of the summer! I got a fantastic job at a B&B in the Okanagan region. Hello wine country!
This was just a short little post to let you all know I'm back! The next moment I have free I will be doing a post on my summer in BC, and look forward to a new makeup look soon too!!!
Apr 30, 2014
Review: Zoku Slush & Shake Maker
Today I have something a little different from my usual makeup reviews. I will be reviewing a fun little kitchen gadget instead. With the summer heat just around the corner, most of us will be looking for ways to stay cool. This is where the Zoku comes in. You can make slushies or milkshakes easily, with only a few simple ingredients! I believe this is available exclusively at Williams Sonoma and costs $19.95.
 This was a gift from my parents because they took a trip to the US recently and had a chance to go into a Williams Sonoma. Williams Sonoma does exist in Canada, just not in Ottawa, so going to one is always a treat. This is honestly not something I would have bought myself, since I already own an ice cream maker, but I am glad to have it now.
 The Zoku comes with three parts. The inner core is the part that you freeze, the outer sleeve is like a cup that the inner core fits into and it also has a stir stick. To use the Zoku, you first must freeze the inner core for at least 8 hours. Once you have done that, put the inner core into the outer sleeve and pour whatever drink you want into it. Next, stir and scrape the sides every minute until you reach the consistency that you want.
I decided to do a full demo of the Zoku Slush & Shake maker, so you can all see how it works for yourself! I made myself a coffee concoction for the demo, in the hopes of having something like an iced capp when I was done. I started by freezing the inner core overnight, to make sure I would hit the 8 hour mark. The next day I made some strong coffee and let it cool before mixing it with some almond milk and simple syrup. I did leave that mixture in the fridge to get as cold as possible before starting.
I poured the coffee mix into the Zoku when it was good and cold. This is it at the very beginning:
 As you can see, it is still completely liquid. I sat with the cup, stirring every minute or so and this is what I had at the 10 minute mark:
 It looks like a slushie!!!!
This product definitely does what it says! I had an awesome frozen coffee in ten minutes! I did notice a few pros and cons while using it though, so I compiled them below.
Pros:
- It does work and can make a fun slushie or milkshake on a hot summer day.
- The design is really nice and comes in many fun colours!
- I love the stir stick/spoon design, it's fun to eat with.
- All the parts are easy to clean and wipe out.
- Overall it was a very fun experience!
Cons:
- It only makes one serving before you have to freeze it again (but if you pour your slushie into another cup immediately, rinse it in cold water, dry it really quickly and throw it back in the freezer, it only needs to freeze for about 2-4 hours)
- The Zoku is hand wash only in lukewarm water, which doesn't bother me, since I have no dishwasher anyways, but some of you might want to take that into consideration.
- It isn't as fast as making an iced coffee or smoothie would be (but it is fun to make).
- It takes up precious space in the freezer.
So overall I am very pleased with my Zoku Slush & Shake Maker! Like I said before, I probably wouldn't have paid $20 for it myself, since I already own an ice cream maker, but I still like it. I have really enjoyed the first few drinks I tried in it and can see myself getting a lot of use out of it this summer!
What do you think of the Zoku? Would you try something like this?


I decided to do a full demo of the Zoku Slush & Shake maker, so you can all see how it works for yourself! I made myself a coffee concoction for the demo, in the hopes of having something like an iced capp when I was done. I started by freezing the inner core overnight, to make sure I would hit the 8 hour mark. The next day I made some strong coffee and let it cool before mixing it with some almond milk and simple syrup. I did leave that mixture in the fridge to get as cold as possible before starting.
I poured the coffee mix into the Zoku when it was good and cold. This is it at the very beginning:


This product definitely does what it says! I had an awesome frozen coffee in ten minutes! I did notice a few pros and cons while using it though, so I compiled them below.
Pros:
- It does work and can make a fun slushie or milkshake on a hot summer day.
- The design is really nice and comes in many fun colours!
- I love the stir stick/spoon design, it's fun to eat with.
- All the parts are easy to clean and wipe out.
- Overall it was a very fun experience!
Cons:
- It only makes one serving before you have to freeze it again (but if you pour your slushie into another cup immediately, rinse it in cold water, dry it really quickly and throw it back in the freezer, it only needs to freeze for about 2-4 hours)
- The Zoku is hand wash only in lukewarm water, which doesn't bother me, since I have no dishwasher anyways, but some of you might want to take that into consideration.
- It isn't as fast as making an iced coffee or smoothie would be (but it is fun to make).
- It takes up precious space in the freezer.
So overall I am very pleased with my Zoku Slush & Shake Maker! Like I said before, I probably wouldn't have paid $20 for it myself, since I already own an ice cream maker, but I still like it. I have really enjoyed the first few drinks I tried in it and can see myself getting a lot of use out of it this summer!
What do you think of the Zoku? Would you try something like this?
Apr 26, 2014
Happy (Late) Easter!
I hope everyone had as good a long weekend as I did! I sadly didn't see my parents this Easter, but I still had a very full and fun weekend! My family isn't very religious, so we decided to postpone our family dinner to later in the week because I had plans with other people. I unfortunately don't have many pictures to show you though, since I was busy and forgot my camera most of the time. I know this post is a bit late, but I have had a busy week!
I spent Friday grocery shopping and Saturday preparing various foods for an Easter party at my friends place that happened on Sunday. I absolutely looooove when I get an opportunity to bake food for other people so I went a little overboard and made 4 different things. I made curry stuffed buns, soft pretzels, chocolate crinkle cookies and a pan of monkey bread! I have photographs of none of it, but if anyone wants to see a post about any of those recipes, just ask in the comments!
I did manage to snap a quick photo of my friday shopping makeup and Easter Sunday makeup, so here they are!!! Light makeup for errands:

This was just foundation, a bright coral blush, mascara and a Revlon Colorburst Matte Balm in Mischievous. The next day for the Easter party I wore this:
 This look was once again done using my Sigma Creme de Couture palette. It has the most perfect pastel Easter shades so I just grabbed it without even looking at anything else that day.
The easter party was so much fun! I got to see a lot of my friends and we had a great time and ate a ton of great food. One of my friends made awesome bacon wrapped chicken bites and another friend made a delicious stew. We played Cards Against Humanity (wich I won wooo!) and watched movies. It was a really special day, and hopefully the starting of a new tradition for us!
The next day my boyfriend and I went to his parents house for their egg hunt and Easter dinner. The egg hunt at Nick's parents is always tons of fun because his dad takes hiding the eggs very seriously. To him, he wins if we don't find all the eggs, which makes the game hilariously difficult. We also had a really good dinner there of ham, roast beef, asparagus, potatoes and lots of other extras! Unfortunately I got no pictures of this day either! It was a pretty camera-less weekend for me...
I finally saw my parents a few days later and had my first barbecued meal of the season, Chicken and grilled vegetables. Yummy! I have truly eaten like a king this week. The rest of my week has been spent spring cleaning. My boyfriend bought us disinfecting wipes with our usual cleaning supplies this time and I love them so much! They have made cleaning so much easier in a lot of cases!
Anyways, that's it for my little life update. What did you guys do for the Easter weekend?
I spent Friday grocery shopping and Saturday preparing various foods for an Easter party at my friends place that happened on Sunday. I absolutely looooove when I get an opportunity to bake food for other people so I went a little overboard and made 4 different things. I made curry stuffed buns, soft pretzels, chocolate crinkle cookies and a pan of monkey bread! I have photographs of none of it, but if anyone wants to see a post about any of those recipes, just ask in the comments!
I did manage to snap a quick photo of my friday shopping makeup and Easter Sunday makeup, so here they are!!! Light makeup for errands:

This was just foundation, a bright coral blush, mascara and a Revlon Colorburst Matte Balm in Mischievous. The next day for the Easter party I wore this:

The easter party was so much fun! I got to see a lot of my friends and we had a great time and ate a ton of great food. One of my friends made awesome bacon wrapped chicken bites and another friend made a delicious stew. We played Cards Against Humanity (wich I won wooo!) and watched movies. It was a really special day, and hopefully the starting of a new tradition for us!
The next day my boyfriend and I went to his parents house for their egg hunt and Easter dinner. The egg hunt at Nick's parents is always tons of fun because his dad takes hiding the eggs very seriously. To him, he wins if we don't find all the eggs, which makes the game hilariously difficult. We also had a really good dinner there of ham, roast beef, asparagus, potatoes and lots of other extras! Unfortunately I got no pictures of this day either! It was a pretty camera-less weekend for me...
I finally saw my parents a few days later and had my first barbecued meal of the season, Chicken and grilled vegetables. Yummy! I have truly eaten like a king this week. The rest of my week has been spent spring cleaning. My boyfriend bought us disinfecting wipes with our usual cleaning supplies this time and I love them so much! They have made cleaning so much easier in a lot of cases!
Anyways, that's it for my little life update. What did you guys do for the Easter weekend?
Apr 16, 2014
More Empties!
I didn't think I would have another empties post for you guys so soon after my last one, but I do! It seems I have been successful in using up more old products while on my spending ban. Most of these are skincare products, not makeup, but it's still an accomplishment!
.JPG) In the back row there is the Garnier Moisture Rescue Refreshing Gel Cream for dry skin, the L'Oreal Volume Collagen Body Boost Root Lifting Spray and a bottle of Thayer's Witch Hazel Toner. In the middle row is the Rimmel Scandaleyes Waterproof Mascara and the Maybelline Fit Me Shine Free Foundation Stick. In the front is a Burt's Bees Ultra Conditioning lip balm.
In the back row there is the Garnier Moisture Rescue Refreshing Gel Cream for dry skin, the L'Oreal Volume Collagen Body Boost Root Lifting Spray and a bottle of Thayer's Witch Hazel Toner. In the middle row is the Rimmel Scandaleyes Waterproof Mascara and the Maybelline Fit Me Shine Free Foundation Stick. In the front is a Burt's Bees Ultra Conditioning lip balm.
Garnier Moisture Rescue Refreshing Gel Cream: This was a nice light gel cream for the face. I have a review for it here. I have to admit, I didn't completely use all of this cream up. One night while applying my face cream before bed, I accidentally knocked the open jar onto the floor and a ton of it flew everywhere! I probably lost half a jar of product. :( This was a nice cream regardless of that issue though. I might repurchase this product again. It was a really nice refreshing gel, but I love to try new face creams, so we shall see.
L'Oreal Volume Collagen Body Boost Root Lifting Spray: As you can see in the picture, I barely touched this product. I bought this shortly before starting my no 'poo challenge. I also found it didn't do all that much to my hair. I am giving this to a friend of mine to see if she likes it any better. I personally wouldn't repurchase this product.
Thayer's Witch Hazel Toner: This is my favourite toner! You can see liquid in the bottle and that is because I repurposed it to hold my apple cider vinegar and water mixture for my hair. I like the spout part, it makes it easy to get the stuff in my hair. I did use up all of the original product that came in here though. To hear me rave about witch hazel click here! I will definitely be repurchasing this toner as soon as I use up all my samples and other bottles of toner.
Rimmel Scandaleyes Waterproof Mascara: This was a very run of the mill black mascara. I probably won't be repurchasing it because I love trying new mascaras, but if that weren't the case, I might.
Maybelline Fit Me Shine Free Foundation Stick: This is a fantastic foundation. For a full review click here! One thing not mentioned in this review though, is how quickly the product ran out. After about 3 weeks of daily use it was almost completely gone! This does make my foundation routine much faster and leaves a nice finish on my face, but I don't want to have to buy a new foundation every three weeks! For that reason, I probably won't ever repurchase this.
Burt's Bees Ultra Conditioning Lip Balm With Kokum Butter: This was a really boring lip balm. There is no flavour or scent to it, which I don't mind, but it also feels like it doesn't do much for your lips. It wears off really fast and doesn't leave my lips feeling any softer. Although I love the rest of the Burt's Bees line, I will not be repurchasing this lip balm again.
That's it for my empties post. If I keep using products up at this rate, I might be able to make this a monthly thing! We will just have to see though. Are there any products that you finished lately? Tell me what they were in the comments!
.JPG)
Garnier Moisture Rescue Refreshing Gel Cream: This was a nice light gel cream for the face. I have a review for it here. I have to admit, I didn't completely use all of this cream up. One night while applying my face cream before bed, I accidentally knocked the open jar onto the floor and a ton of it flew everywhere! I probably lost half a jar of product. :( This was a nice cream regardless of that issue though. I might repurchase this product again. It was a really nice refreshing gel, but I love to try new face creams, so we shall see.
L'Oreal Volume Collagen Body Boost Root Lifting Spray: As you can see in the picture, I barely touched this product. I bought this shortly before starting my no 'poo challenge. I also found it didn't do all that much to my hair. I am giving this to a friend of mine to see if she likes it any better. I personally wouldn't repurchase this product.
Thayer's Witch Hazel Toner: This is my favourite toner! You can see liquid in the bottle and that is because I repurposed it to hold my apple cider vinegar and water mixture for my hair. I like the spout part, it makes it easy to get the stuff in my hair. I did use up all of the original product that came in here though. To hear me rave about witch hazel click here! I will definitely be repurchasing this toner as soon as I use up all my samples and other bottles of toner.
Rimmel Scandaleyes Waterproof Mascara: This was a very run of the mill black mascara. I probably won't be repurchasing it because I love trying new mascaras, but if that weren't the case, I might.
Maybelline Fit Me Shine Free Foundation Stick: This is a fantastic foundation. For a full review click here! One thing not mentioned in this review though, is how quickly the product ran out. After about 3 weeks of daily use it was almost completely gone! This does make my foundation routine much faster and leaves a nice finish on my face, but I don't want to have to buy a new foundation every three weeks! For that reason, I probably won't ever repurchase this.
Burt's Bees Ultra Conditioning Lip Balm With Kokum Butter: This was a really boring lip balm. There is no flavour or scent to it, which I don't mind, but it also feels like it doesn't do much for your lips. It wears off really fast and doesn't leave my lips feeling any softer. Although I love the rest of the Burt's Bees line, I will not be repurchasing this lip balm again.
That's it for my empties post. If I keep using products up at this rate, I might be able to make this a monthly thing! We will just have to see though. Are there any products that you finished lately? Tell me what they were in the comments!
Apr 15, 2014
Quick Look: April Showers
Today's look reminds me of spring rains. The eyes are mostly blue and green with a bit of yellow bursting through, like the sun through the clouds. This is what the weather here has been like for the last few days. Even though it is warmer and sometimes sunnier than it has been in a long time, the rain keeps randomly bursting out. We even had some pretty crazy thunderstorms yesterday. I hope my eye makeup reflects this a little bit.


 Please excuse my gross hair. One side of it seriously needs to calm down!
My entire eye look was done with the Sigma Creme de Couture palette. I feel kind of bad for using it so often because it was a limited edition item, but I have been waiting all winter to bust these colours out in full force! They are just the most perfect shades for spring! I basically used all of the blue shades and the mintier green shades, as well as the yellow. I also darkened my crease a tiny bit with the brown.
I tried something a little bit different with my blush. I applied it along the top of my cheekbones and all the way up to my temples. It gave me an extra flushed look, but I can't decide if it looks cute or like a sunburn. :P To do this I used a mixture of the peach and golden pink shades from my BH Cosmetics Glamorous Blush Palette.
Finally for the lips I used Impulse Cosmetics' lipstick in Psychedelic. This sort of broke the April Showers look up a bit, but I really like how the colours worked together anyways!
This look was especially fun to create because I love the colours, but also because the Sigma Creme de Couture palette is so much fun to work with. The pastel shades in it just make me happy to look at. I hope you enjoyed my pastel version of a spring shower themed eye! I hope your April has been less rainy than mine so far!
Apr 14, 2014
Quick Look: It's Spring!!!
I know I said I wouldn't do another pink eye look so soon, but I was clearly mistaken. Spring is finally here and I was inspired to do this bright look!


.JPG) For this look I used my BH Cosmetics 88 matte palette again. I used a bunch of colours in the pink rows to do it and finished with a winged eyeliner. On my lips is a lipstick by Impulse Cosmetics in Circus. It is a great pastel teal colour that I think is perfect for spring. And finally on my cheeks is the brightest pink/purple blush from the BH Cosmetics Glamorous Blush Palette. I kept most of the colour concentrated on the apples of my cheeks.
For this look I used my BH Cosmetics 88 matte palette again. I used a bunch of colours in the pink rows to do it and finished with a winged eyeliner. On my lips is a lipstick by Impulse Cosmetics in Circus. It is a great pastel teal colour that I think is perfect for spring. And finally on my cheeks is the brightest pink/purple blush from the BH Cosmetics Glamorous Blush Palette. I kept most of the colour concentrated on the apples of my cheeks.
That's it for the look. I hope it got you all in the mood for spring! What colours are your favourite for spring?


.JPG)
That's it for the look. I hope it got you all in the mood for spring! What colours are your favourite for spring?
Apr 10, 2014
Drag Queen Inspired!
I have a confession to make. I wish I was a drag queen! No really, I want to be a man who dresses up like a lady. I saw my first drag show at around the age of 16 and I have been in love with queens ever since! The giant hair, the bright makeup, the glittery clothes, for some reason it all looks better on a man! :P
Anyways, I have been on a RuPaul's Drag Race binge lately and was inspired to come up with this look:


 I took another foray into the world of fake lashes for this look. It wouldn't be a proper drag queen look without false eyelashes! I took me about 3 tries and one eye stabbing to get them on properly though... I also find them very uncomfortable to wear, but they are just cheap-o lashes from amazon. I went with the most natural looking lashes I had since I tried heavier ones first and gave up on those, lol. You can sort of see in the third picture how messed up my eyeliner looks and this is because of all the eyelash issues I had.
For my eyes I mainly used my BH Cosmetics 88 matte palette, except for the inner 1/3 of my eye and inner corner which is Pistachio eyeshadow by Madison Street Beauty. I used various shades of brown from the palette to do the cut crease and the bottom lashline. I then filled in the centre of my lid with a bright green from the 88 palette.
The most fun I had in this look was with the contouring. I don't know how well it shows up in the photos, but I really contoured the crap out of my face. I first used my ELF Blush & Bronzer Cream in St. Lucia under my cheeks, under my chin, along my jawbone and hairline, as well as in my temples. I set that cream with the ELF Blush and Bronzer powder in the same colour. I then used a medium brown from the 88 matte palette to contour my cheeks further, as well as the sides of my nose and around the end of my nose. I then used a very small bit of the blush side of the St. Lucia duo on the sides of my cheekbones, just for a slight hint of colour in my cheeks.
I filled my eyebrows in with a very dark, almost black brown shade. I made them as arched as I could and blended the inner part downwards into the cut crease line. I then pulled the corner of the blended part further in toward my nose.
And finally, just to keep this look as crazy as possible, I needed to add a bright teal lipstick. I used my trusty Impulse Cosmetics lipstick in Lobotomy. In true drag queen fashion I did go farther outside of my lipline to make my lips look larger. I didn't go very far outside of it though, so my lips still look pretty tiny, but did make my cupid's bow as pointy as possible.
That's it for the look! Do you watch RuPaul's Drag Race? Let me know in the comments below!
Anyways, I have been on a RuPaul's Drag Race binge lately and was inspired to come up with this look:


For my eyes I mainly used my BH Cosmetics 88 matte palette, except for the inner 1/3 of my eye and inner corner which is Pistachio eyeshadow by Madison Street Beauty. I used various shades of brown from the palette to do the cut crease and the bottom lashline. I then filled in the centre of my lid with a bright green from the 88 palette.
The most fun I had in this look was with the contouring. I don't know how well it shows up in the photos, but I really contoured the crap out of my face. I first used my ELF Blush & Bronzer Cream in St. Lucia under my cheeks, under my chin, along my jawbone and hairline, as well as in my temples. I set that cream with the ELF Blush and Bronzer powder in the same colour. I then used a medium brown from the 88 matte palette to contour my cheeks further, as well as the sides of my nose and around the end of my nose. I then used a very small bit of the blush side of the St. Lucia duo on the sides of my cheekbones, just for a slight hint of colour in my cheeks.
I filled my eyebrows in with a very dark, almost black brown shade. I made them as arched as I could and blended the inner part downwards into the cut crease line. I then pulled the corner of the blended part further in toward my nose.
And finally, just to keep this look as crazy as possible, I needed to add a bright teal lipstick. I used my trusty Impulse Cosmetics lipstick in Lobotomy. In true drag queen fashion I did go farther outside of my lipline to make my lips look larger. I didn't go very far outside of it though, so my lips still look pretty tiny, but did make my cupid's bow as pointy as possible.
That's it for the look! Do you watch RuPaul's Drag Race? Let me know in the comments below!
Music I'm Listening To
I have never done a post like this, but I thought I would share with you some of my favourite songs at the moment! You guys all know my makeup tastes, so I though you should get to know some of the other things I am interested in. I might also have a slight alterior motive for this post that I will mention at the end.
Music is really important to me. I don't play music myself really (that's my DJ/Musician boyfriend's job) but I spend most of my day listening to some music or other. These are just a few of the songs I have played recently. Not all of them are new songs, but in my opinion they are all great. I may nerd out a bit while describing them though, so you can just skip to the videos if you want.
Ode To The Bouncer by Studio Killers
I love Studio Killers and this song has been stuck in my head a lot lately. It's just a really fun song that makes me want to dance. This is a band made up of fictional cartoon characters, much like Prozzak or The Gorillaz. I am also completely in love with the character who is singing, Chubby Cherry. She is so fabulous! Word is that she is voiced by a man, which I think is awesome. I will definitely have to try and recreate some of her makeup looks soon.
Cookie Thumper by Die Antwoord
Die Antwoord is a South African rap group that I am a huuuuge fan of. I have been listening to their music for years and I think they have finally hit their stride. Their newer stuff is definitely getting a lot better. I will warn you now though, they are not for the faint of heart. This song is much tamer than a lot of their other stuff. If you decide to listen to any more of their music, just be warned that at some point they will say something offensive about almost every group of people you could think of. They aren't actually discriminating people, often it is done to make a point, but many people still end up offended. They also have ridiculous, long intros in most of their videos.
Choosing For You by I Am Legion
A little while ago one of my favourite DJ groups, Noisia, decided to team up with my all time favourite rap group, Foreign Beggars, to create the super group I Am Legion. When I first heard that they were planning this I literally started running around my apartment dancing/freaking out in excitement and they definitely have not disappointed! Here is one of the first songs they released off the new album:
Like The Angel by Rise Against
I am not ashamed to say that Rise Against has been one of my all time favourite bands for many many many years. As far as good (but kinda mainstream) punk goes they are right up there with Bad Religion for me. I think I know every single one of their songs by heart. This is a song of the album Revolutions Per Minute, one of their best albums in my opinion.
And finally I am going to shamelessly plug my boyfriend, DJ Nick Tesla's newest remix of Hero by Pegboard Nerds. He has actually entered a contest with this one, so I am leaving the link to where you can listen to it and vote for him HERE. It would mean a lot to both of us if you took a second and voted!
What did you think of this post? Would you like to see more things like this in the future? Also, let me know what your favourite song of the moment is in the comments below!!!
Apr 8, 2014
Quick Look: Arrrrr Matey!
I posted the pirate makeup I did on my boyfriend for a party last week already and I am finally getting around to posting my own makeup from that night!

 I didn't get many good pictures of this look since I was in a hurry, which is a shame because this is one of my favourite looks that I have done lately.
To do my eyes I used Star Crushed Minerals' Wine eyeshadow on my inner and outer corner, leaving the centre empty. I then took Hearts of Black Lace by Notoriously Morbid Cosmetics and used that in my crease and the outer half of my bottom lashline. I then used the shade Tempest from the same company on the centre of my lid for and extra shimmery pop of dimension. I also used that on the inner half of my bottom lashline and right near my tear duct. I lined my waterline with a white pencil and set it with Cloud Coverage by Glamour Doll Eyes. I used that on my brow bone as well. I finished it off with some winged liquid liner and mascara.
I did a pretty heavy contour on my face with the ELF Blush & Bronzer Cream in St. Lucia and set it with the powder version. On my lips is Pandora by Impulse Cosmetics.
I did actually wear a full costume, but forgot to take outfit photos, as usual. Here are a couple of camera phone snaps that show most of my costume though!
.JPG)
.JPG) I wore my awesome pirate hat that I bought on Etsy a few years ago. It has many ribbons and feathers and adornments! Nick and I took turns wearing it all night because it gets hot when you are dancing. I wore a pirate shirt that is also from Etsy with a black, studded, high-waist belt. I wore a stripey miniskirt, fishnet tights and black boots, all of which you cannot see. Perhaps I will redo this with a full outfit for Halloween this year!
I wore my awesome pirate hat that I bought on Etsy a few years ago. It has many ribbons and feathers and adornments! Nick and I took turns wearing it all night because it gets hot when you are dancing. I wore a pirate shirt that is also from Etsy with a black, studded, high-waist belt. I wore a stripey miniskirt, fishnet tights and black boots, all of which you cannot see. Perhaps I will redo this with a full outfit for Halloween this year!
That's it for this look, I hope you liked it!


To do my eyes I used Star Crushed Minerals' Wine eyeshadow on my inner and outer corner, leaving the centre empty. I then took Hearts of Black Lace by Notoriously Morbid Cosmetics and used that in my crease and the outer half of my bottom lashline. I then used the shade Tempest from the same company on the centre of my lid for and extra shimmery pop of dimension. I also used that on the inner half of my bottom lashline and right near my tear duct. I lined my waterline with a white pencil and set it with Cloud Coverage by Glamour Doll Eyes. I used that on my brow bone as well. I finished it off with some winged liquid liner and mascara.
I did a pretty heavy contour on my face with the ELF Blush & Bronzer Cream in St. Lucia and set it with the powder version. On my lips is Pandora by Impulse Cosmetics.
I did actually wear a full costume, but forgot to take outfit photos, as usual. Here are a couple of camera phone snaps that show most of my costume though!
.JPG)
.JPG)
That's it for this look, I hope you liked it!
Apr 6, 2014
My No Makeup Makeup Look! (My Foundation Routine)
Normally, I am used to jamming colours all over my face daily. Often if I am not going to be doing extra bright makeup, I won't wear any at all to go out. I don't have too many skin complaints, other than my disgusting eye bags, so I don't mind going places with a bare face. Sometimes I do need to pull out a nice toned down makeup look. One that makes me look a bit more refined without looking like I have caked on the makeup! Today's look is for those occasions.
I am actually going to walk you through all of the skin products and foundation I use as well. I don't often do that because I want to focus on the eyeshadow, but today we want to focus mainly on skin. The goal is to look as fresh and awake as possible. I will warn you now that this is going to be a really loooong post so that I can thoroughly explain everything.
I will show you the look first, then tell you what I did.

 I love my hair like this I think I'm just going to keep doing it this way! It is so easy! If you want to see how it is done click here!
To start my makeup off I make sure my face is cleansed and tones. I use Cetaphil cleanser and have been for years. I find it gentle and non-drying. I then toned my face with Sisley's Floral Toning Lotion. I ran out of my usual witch hazel toner, and had a sample bottle of this stuff, so I am using it up. Once I am clean and fresh I add a layer of moisturizer. I used a garnier for dry skin face moisturizer and the Burt's Bees Radiance Eye Cream on my puffy eye bags. I put a fairly thick layer of moisturizer on and let it sink in for several minutes if I have enough time.
Next comes foundation. I don't use primer unless I am going out at night. For my foundation I used my favourite, Annabelle Skin True in their lightest shade. Unfortunately that means that this foundation is not good for really pale ladies, but if you have medium toned skin, this stuff is perfect! To apply this I use the elf duo fibre stippling brush. I place a pea sized amount of foundation on the back of my hand, then dot that all over my face. With the brush I smooth it over my face first, then I use small circular motions to make it blend seamlessly into my skin.
Now it is time for concealer. I use the BH Cosmetics Jumbo Concealer Pencil in Fair on any spots or redness I have, as well as around my mouth because that is always discoloured on me. I don't often have many spots to conceal but i blend a bit of this, with my finger, over all the red patches on my cheeks and nose that foundation won't quite cover. I then use a undereye brightener/concealer. The one I used today was the Maybelline Dream Lumi Touch Concealer in the shade Ivory. to apply it I sweep it under my tear bag and on my bigger undereye bag, then pat it in with my ring finger. Afterwards I rub any leftover concealer on my finger onto my upper eyelid.
To set everything I used the ELF HD Setting Powder and the ELF flat powder brush. This brush is huge and has a very flat top. I only use patting motions and apply a very small amount of powder all over my face.
For blush I used the ELF Blush & Bronzer duo in St. Lucia and the small stippling brush from ELf as well. This is a really tiny stippling rush and it is perfect if you don't want to apply too much blush. On heavier makeup days I normally use a larger blush brush. I used only the blush side in the compact. I used circular motions to apply the blush only to the highest part of my cheekbones, bringing it back to my hairline. For a really natural flush I make sure not to apply any blush to the apples of my cheeks only on the sides as high up as possible.
And Now your face is mostly finished! You could really just apply a bit of mascara and go if you wanted to. I did just a few more things though, to make this look a bit more put together. First off, my eyebrows are pretty sparse on their own so I used my Dermafrost Beauty Indellible Brow pencil in the shade taupe then ran a spooly brush through them.
I didn't do any eyeshadow, but I did use a plain black eyeliner pencil to do a thin line across my top lashline. This helps define my lashline and make my eyes look a bit rounder or more open. If you already have very round eyes you can line only the outer half of your lashline. This will make the eye a bit more elongated. I did the tiniest of wings on my outer corner because I just couldn't help myself but you don't have to. I then applied 2 coats of mascara to my top lashes only. You can put a coat on your bottom lashes if you want, but mine are so short that it doesn't always end well.
The finaly thing for this look was a quick swipe of a light pink lip gloss. I used a Burt's Bees Lip Shine in the shade Wink.
 And that's it for the look! This post was starting to seem long and wordy so here is a goofy pic to end it.
I hope this post helped a few of you! I often try to end these posts with a question for you guys but I can't really think of any right now.... What's your favourite foundation I guess?
I am actually going to walk you through all of the skin products and foundation I use as well. I don't often do that because I want to focus on the eyeshadow, but today we want to focus mainly on skin. The goal is to look as fresh and awake as possible. I will warn you now that this is going to be a really loooong post so that I can thoroughly explain everything.
I will show you the look first, then tell you what I did.


To start my makeup off I make sure my face is cleansed and tones. I use Cetaphil cleanser and have been for years. I find it gentle and non-drying. I then toned my face with Sisley's Floral Toning Lotion. I ran out of my usual witch hazel toner, and had a sample bottle of this stuff, so I am using it up. Once I am clean and fresh I add a layer of moisturizer. I used a garnier for dry skin face moisturizer and the Burt's Bees Radiance Eye Cream on my puffy eye bags. I put a fairly thick layer of moisturizer on and let it sink in for several minutes if I have enough time.
Next comes foundation. I don't use primer unless I am going out at night. For my foundation I used my favourite, Annabelle Skin True in their lightest shade. Unfortunately that means that this foundation is not good for really pale ladies, but if you have medium toned skin, this stuff is perfect! To apply this I use the elf duo fibre stippling brush. I place a pea sized amount of foundation on the back of my hand, then dot that all over my face. With the brush I smooth it over my face first, then I use small circular motions to make it blend seamlessly into my skin.
Now it is time for concealer. I use the BH Cosmetics Jumbo Concealer Pencil in Fair on any spots or redness I have, as well as around my mouth because that is always discoloured on me. I don't often have many spots to conceal but i blend a bit of this, with my finger, over all the red patches on my cheeks and nose that foundation won't quite cover. I then use a undereye brightener/concealer. The one I used today was the Maybelline Dream Lumi Touch Concealer in the shade Ivory. to apply it I sweep it under my tear bag and on my bigger undereye bag, then pat it in with my ring finger. Afterwards I rub any leftover concealer on my finger onto my upper eyelid.
To set everything I used the ELF HD Setting Powder and the ELF flat powder brush. This brush is huge and has a very flat top. I only use patting motions and apply a very small amount of powder all over my face.
For blush I used the ELF Blush & Bronzer duo in St. Lucia and the small stippling brush from ELf as well. This is a really tiny stippling rush and it is perfect if you don't want to apply too much blush. On heavier makeup days I normally use a larger blush brush. I used only the blush side in the compact. I used circular motions to apply the blush only to the highest part of my cheekbones, bringing it back to my hairline. For a really natural flush I make sure not to apply any blush to the apples of my cheeks only on the sides as high up as possible.
And Now your face is mostly finished! You could really just apply a bit of mascara and go if you wanted to. I did just a few more things though, to make this look a bit more put together. First off, my eyebrows are pretty sparse on their own so I used my Dermafrost Beauty Indellible Brow pencil in the shade taupe then ran a spooly brush through them.
I didn't do any eyeshadow, but I did use a plain black eyeliner pencil to do a thin line across my top lashline. This helps define my lashline and make my eyes look a bit rounder or more open. If you already have very round eyes you can line only the outer half of your lashline. This will make the eye a bit more elongated. I did the tiniest of wings on my outer corner because I just couldn't help myself but you don't have to. I then applied 2 coats of mascara to my top lashes only. You can put a coat on your bottom lashes if you want, but mine are so short that it doesn't always end well.
The finaly thing for this look was a quick swipe of a light pink lip gloss. I used a Burt's Bees Lip Shine in the shade Wink.

I hope this post helped a few of you! I often try to end these posts with a question for you guys but I can't really think of any right now.... What's your favourite foundation I guess?
Apr 4, 2014
Quick Look: For Everyone Who Says Blue Eyeshadow Is Tacky....
Suck on this!


 Haha! Sorry, I really couldn't help myself with the title there. I think I look a bit smug in these pictures too lol.
I had originally intended to to a blue and green eye, but I got going with the blue and this just happened! I used the bright blue from my Lunatick Cosmetic Labs AlieNEON glitter stacker for this eye. This was actually a really simple look. I swept that all over the lid and blended it up lightly right to my brows. I then added a bit of the Blue Chocolat shade from my Sigma Creme de Couture palette to blend it further. I finished by adding a ton of silver to my inner corner and bottom lashline. The silver I used is L'ancome's Color Design eyeshadow in Style Selection, which I think is the only silver I own. On my lips is Impulse Cosmetics' Permafrost lipstick.
You will have to excuse how tired I look in these photos! I actually did the eye makeup near the end of the day, since I thought I had nowhere to go, but then someone called me and said they could give me a ride to the grocery store, so out the door I went. That's right, I don't drive... :P Anyways, my day ended up busier than I planned and once I got home and was finally ready to take pictures, my makeup had been on for several hours and I was tired! The lipstick was added just before I took pictures though, so at least it looks fresh!
Well, that's it for the look! I am really pleased by how well the lipstick matches the eyes. What's your opinion on blue eyeshadow? Do you think it's tacky?
Apr 2, 2014
Quick Look: Hot Pink
Today's look is a super hot pink eye! I have done a lot of pink eyes lately, which is weird since pink is normally my least used colour. I think I have noticed that and have been making a somewhat conscious effort to use it more often.
I also have crimped, wavy hair in these pictures from a pirate themed party the other night. I thought my hair would be more piratey if I crimped it and then put some little braids all through it. this is what it looked like the next day. I have done this kind of hair before, so you can see the tutorial for it here! I loooooove my hair like this and really want to do it more often! I'll have a post with pics of my pirate makeup up soon! Unfortunately it was a busy night and I didn't get many good pictures, so I'm still trying to decide which to use...
Anyways, on to the look. I went pretty bold everywhere. I did some contouring and bronzing with my ELF Blush & Bronzing Cream duo in St. Lucia, then a bright eye and a bold, dark lip. Here it is:


.JPG) I was playing with lighting a bit this time. I'm not sure how I feel about the last picture. My horrible under eye bags look gross, but it shows the makeup accurately. I am still so not a photographer!
I was playing with lighting a bit this time. I'm not sure how I feel about the last picture. My horrible under eye bags look gross, but it shows the makeup accurately. I am still so not a photographer!
I used my only Manic Panic eyeshadow to do this look and it is one of their Love Colour eyeshadows in Mod-A-Go-Go, which is an almost neon hot pink. It has a very matte base, but it is packed with silver glitter! I've had this colour for a long time and it is one of the brightest hot pinks that I own, but it does take a lot of work to get it on. The hardest part really is getting it on to the brush. It's a really hard eyeshadow so you need to jam your brush in it to get any product. Once you work it onto your brush though, the colour payoff is nice, plus the glitter transfers onto the lid well too!
To do this look I placed Mod-A-Go-Go all over the lid, on the bottom lashline and lid, and all in the outer corner so it formed a big oval around my eye. I then used a Star Crushed Minerals eyeshadow in Wine in my crease, outer corner and slightly on the bottom lashline. I deepened the crease further with a bit of a matte black eyeshadow from NYX. I blended all the edges out with Madison Street Beauty's Rose Quartz eyeshadow, which is a matte pale pink. I then lined my waterline with black and did a really elongated eyeliner wing on the top. I also used a shimmery white called Lexington from Glamour Doll Eyes on my inner corner.
For my blush I used NARS Mata Hari and on my lips is Pandora from Impulse Cosmetics. I think this is my new favourite lipstick in the normal range of colours. I still have favourites out of my blues and greens though!
That is it for this pink look. I probably won't do another pink look for a while, it really isn't my favourite colour. I would much rather cover my face in greens or blues or bright neon oranges!
What is your least favourite makeup colour? Do any of your products get ignored because of it?
I also have crimped, wavy hair in these pictures from a pirate themed party the other night. I thought my hair would be more piratey if I crimped it and then put some little braids all through it. this is what it looked like the next day. I have done this kind of hair before, so you can see the tutorial for it here! I loooooove my hair like this and really want to do it more often! I'll have a post with pics of my pirate makeup up soon! Unfortunately it was a busy night and I didn't get many good pictures, so I'm still trying to decide which to use...
Anyways, on to the look. I went pretty bold everywhere. I did some contouring and bronzing with my ELF Blush & Bronzing Cream duo in St. Lucia, then a bright eye and a bold, dark lip. Here it is:


.JPG)
I used my only Manic Panic eyeshadow to do this look and it is one of their Love Colour eyeshadows in Mod-A-Go-Go, which is an almost neon hot pink. It has a very matte base, but it is packed with silver glitter! I've had this colour for a long time and it is one of the brightest hot pinks that I own, but it does take a lot of work to get it on. The hardest part really is getting it on to the brush. It's a really hard eyeshadow so you need to jam your brush in it to get any product. Once you work it onto your brush though, the colour payoff is nice, plus the glitter transfers onto the lid well too!
To do this look I placed Mod-A-Go-Go all over the lid, on the bottom lashline and lid, and all in the outer corner so it formed a big oval around my eye. I then used a Star Crushed Minerals eyeshadow in Wine in my crease, outer corner and slightly on the bottom lashline. I deepened the crease further with a bit of a matte black eyeshadow from NYX. I blended all the edges out with Madison Street Beauty's Rose Quartz eyeshadow, which is a matte pale pink. I then lined my waterline with black and did a really elongated eyeliner wing on the top. I also used a shimmery white called Lexington from Glamour Doll Eyes on my inner corner.
For my blush I used NARS Mata Hari and on my lips is Pandora from Impulse Cosmetics. I think this is my new favourite lipstick in the normal range of colours. I still have favourites out of my blues and greens though!
That is it for this pink look. I probably won't do another pink look for a while, it really isn't my favourite colour. I would much rather cover my face in greens or blues or bright neon oranges!
What is your least favourite makeup colour? Do any of your products get ignored because of it?
Mar 31, 2014
I Did My Boyfriend's Makeup, Pirate Style!
The other night my boyfriend, Nick, and I went to an event that was pirate themed. We both had pirate costumes from past Halloweens lying around so we decided to go all out! This included Nick letting me do his makeup to look like an evil pirate!!! I will post the look I wore myself soon, but for today, let's focus on his face.

 He kept glaring at me like in the first picture all night, it was creepy!
Anyways, to do his makeup I put black eyeliner in his waterline, then drew a thick line on the top and bottom lashline and blended them out with a smudge brush. I then took a matte black eyeshadow and pulled the black under his eyes further down. With a fluffy blending brush I used a bright matte red to blend out the edges of the black eyeshadow. I also blended the red around the outer corners of his eyes just a tiny bit. To finish the look off and make it slightly more interesting than just a dark shadowy eye, I took a flat eyeliner brush dipped in the black eyeshadow and pulled black streaks out from the centre of his eyes, mostly on the bottom lashline.
And that was it! This was a really easy look, and it worked out great for the night. I hope you like it!
Mar 27, 2014
Another Impulse Cosmetics Review
I did it again, broke the spending ban. Impulse Cosmetics was having a sale and all of their glitters were half off. I had been eyeing a few of their glitters for a while so I just couldn't help myself! They are normally $4 but they were only $2 so I don't feel that bad. I picked out 2 that I have wanted for a while and I just couldn't help but throwing another lipstick into my order too.
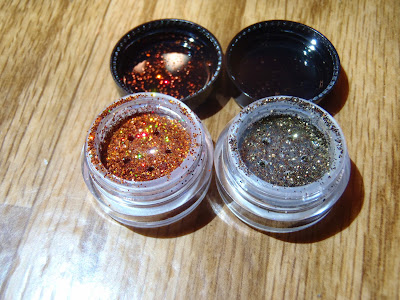
 The Glitters I picked were Half-Baked, a bronzey orange holographic glitter and Raven, a black and gold glitter mix. The lipstick I got is Pandora, a dark purple. Here are a couple shots of the glitters in different lighting:

I would have done proper swatches, but I can't find my dang glitter adhesive right now! Oh well...
Half Baked is such an amazing shade. This is definitely my favourite of the two. The holographic effect is much more pronounced in person. Orange is also one of my favourite colours, so it is great. Raven is a nice dark gold with some black glitter mixed in. It is clear to me that they put a lot of effort into making some really unique glitter mixes. If you check out their Etsy store you can see that they have a lot of really interesting glitters, not just these two. I already have my eye on a few more including one called Screamsicle.
As for the lipstick, here is a swatch:
 Impulse Cosmetics calls Pandora as a black cherry colour and I think that is the perfect descriptor. I love this shade soooo much! It isn't really a spring colour, but who cares? This has the same creamy matte formula as their other lipsticks and seems to last a long time before needing touch-ups. I'll have a look using this soon.
Anyways, that's it for the review and little spending ban update. What is your favourite glitter?


I would have done proper swatches, but I can't find my dang glitter adhesive right now! Oh well...
Half Baked is such an amazing shade. This is definitely my favourite of the two. The holographic effect is much more pronounced in person. Orange is also one of my favourite colours, so it is great. Raven is a nice dark gold with some black glitter mixed in. It is clear to me that they put a lot of effort into making some really unique glitter mixes. If you check out their Etsy store you can see that they have a lot of really interesting glitters, not just these two. I already have my eye on a few more including one called Screamsicle.
As for the lipstick, here is a swatch:

Anyways, that's it for the review and little spending ban update. What is your favourite glitter?
No Knead Bread!
I was looking for a really easy loaf of bread to make a few weeks ago when I stumbled across something called no knead bread. I'm not sure how I haven't heard of this before, but I'm glad I have the recipe now! I read about a zillion similar recipes and methods before trying it myself, so I don't have a particular blog or anything to credit. I will link you to this version of the recipe though, where an adorable 4 year old shows you how to do it! I have tried this bread a few times now, so I will tell you what works best for me.
Ingredients:
- 3 cups all purpose flour
- 1 tsp instant yeast
- 1-2 tsp salt (I used 2, I like salt)
- 1 1/2 cups water
Making this is really easy. Mix the dry ingredients in a big bowl. Pour in the water and stir with a big spoon until you have a very rough dough. You really don't need to stir too much. Next put some saran wrap or a lid on the bowl and leave it in a relatively warm place for 8-18 hours.
When you next look at the dough it should have doubled in size and be bubbly. Wet your hands and pull the dough out. Form it into a ball and leave it on a lightly floured surface, or on a piece of parchment paper like I did. Let the dough rest like this for half an hour.
To cook the dough there are two methods. The first uses an oven safe pot with a lid. The second uses any oven safe pan and a steam bath. I used the second method. First, put whatever container you chose into the oven and turn it on to 450 degrees. You want the pot to preheat with the oven and get hot too. Make sure your pot container is oven safe though, or you could not only ruin a pot, but also your oven. I used a 9x9 Pyrex baking dish for mine. I also slid a metal baking pan onto the bottom rack. Once the 30 minutes is up and your oven and pot are hot, quickly put the dough ball in the pan/pot (I just plunk the parchment paper right in it) and fill the metal pan in the bottom with water to create steam. I have found that about 3 cups of water is necessary. Be careful, steam can burn you! I like to wrap my hand in a towel so it can't burn. If you are using a pot with a lid you don't need the steam bath, steam will generate inside the pot while it cooks. Bake the bread for 30 minutes with the steam bath or lid, then bake it for another 15 minutes without.
And voila! Bread!
 It is seriously that easy! This has a lovely crackly crust and soft insides. I enjoyed a few slices of this loaf dipped in some olive oils and balsamic vinegar!
I have a few notes to add after baking this multiple times. The first thing is that I like to let the steam bath go on a bit longer, sometimes an extra 5 minutes or more. This makes the crust a bit thicker and crunchier, which I like. Next is that the longer you leave the dough to rise, the bigger your loaf will be. It will also have slightly bigger air pockets inside. I left one loaf for only 8 hours and it was considerably smaller than the ones I left for 12 hours or more. This means a slice of the smaller loaf will be a bit denser and heavier to eat. I have also found that this is a great recipe to mix other ingredients into. You can mix herbs, nuts, raisins or basically anything into it and it will still work out fine!
I hope this inspired a few of you to go make some bread! This is a very easy recipe to start with, and it is really delicious!
Ingredients:
- 3 cups all purpose flour
- 1 tsp instant yeast
- 1-2 tsp salt (I used 2, I like salt)
- 1 1/2 cups water
Making this is really easy. Mix the dry ingredients in a big bowl. Pour in the water and stir with a big spoon until you have a very rough dough. You really don't need to stir too much. Next put some saran wrap or a lid on the bowl and leave it in a relatively warm place for 8-18 hours.
When you next look at the dough it should have doubled in size and be bubbly. Wet your hands and pull the dough out. Form it into a ball and leave it on a lightly floured surface, or on a piece of parchment paper like I did. Let the dough rest like this for half an hour.
To cook the dough there are two methods. The first uses an oven safe pot with a lid. The second uses any oven safe pan and a steam bath. I used the second method. First, put whatever container you chose into the oven and turn it on to 450 degrees. You want the pot to preheat with the oven and get hot too. Make sure your pot container is oven safe though, or you could not only ruin a pot, but also your oven. I used a 9x9 Pyrex baking dish for mine. I also slid a metal baking pan onto the bottom rack. Once the 30 minutes is up and your oven and pot are hot, quickly put the dough ball in the pan/pot (I just plunk the parchment paper right in it) and fill the metal pan in the bottom with water to create steam. I have found that about 3 cups of water is necessary. Be careful, steam can burn you! I like to wrap my hand in a towel so it can't burn. If you are using a pot with a lid you don't need the steam bath, steam will generate inside the pot while it cooks. Bake the bread for 30 minutes with the steam bath or lid, then bake it for another 15 minutes without.
And voila! Bread!

I have a few notes to add after baking this multiple times. The first thing is that I like to let the steam bath go on a bit longer, sometimes an extra 5 minutes or more. This makes the crust a bit thicker and crunchier, which I like. Next is that the longer you leave the dough to rise, the bigger your loaf will be. It will also have slightly bigger air pockets inside. I left one loaf for only 8 hours and it was considerably smaller than the ones I left for 12 hours or more. This means a slice of the smaller loaf will be a bit denser and heavier to eat. I have also found that this is a great recipe to mix other ingredients into. You can mix herbs, nuts, raisins or basically anything into it and it will still work out fine!
I hope this inspired a few of you to go make some bread! This is a very easy recipe to start with, and it is really delicious!
Mar 22, 2014
Quick Look: Gold Digger
While looking through my loose pigments today I happened across Gold Digger by Glamour Doll Eyes and realized I have barely used it! I don't know why, it is a really great gold shade, so I decided to do a look with it.


 I look super serious in that second one.
For my eyes I used Gold Digger all over the lid and up almost to my brow bone. Gold Digger is a gorgeous medium gold that isn't too sparkly or shimmery, but has a nice metallic sheen to it. I want to try it foiled next! I then used Madison Street Beauty's Golden olive lightly in the crease and on my bottom lid. I used Madison Street Beauty's Pear eyeshadow on my inner corner and right on the centre of my lid for some extra sparkle! I then used a tiny little bit of a matte black eyeshadow to smoke out my bottom lashline a bit more. I finished my eyes by putting black eyeliner in my waterline and tight-lining, as well as adding mascara.
For my lips today I used Agent X by Impulse Cosmetics! If you haven't heard of my love affair with this company yet, you should check them out! I blotted it down quite a bit for an extra matte finish.
That's it for the look! What is your favourite gold eyeshadow?
Mar 18, 2014
Quick Look: Shamrock Green
Happy late St. Patrick's Day Everyone! I hope you all had a good night last night! I know this look is a little late now, but this is what I wore out a couple of nights ago. I haven't had a chance to post it until now though, sorry!
I did my hair too! I took the front part and made it into a pouf type thing and pulled the sides back too. I did it by twisting the front section backwards and then pushing it forward a bit, then securing it with two bobby pins. I then pulled the side parts, by my ears, all the way to the back of my head and pinned that all with 3 bobby pins. I'm sorry for that ridiculous explanation, but I don't do hair, so I don't know how else to explain it!


 I just did bright green eye with some really winged out eyeliner. I used the green shade from my Lunatick Labs AlieNEON stacker on the inner corner and my bottom lashline. I then used Glamour Doll Eye Shamrock all over the rest of the lid. In the crease I used a dark matte green from Madison Street Beauty, coincidentally also called Shamrock! I blended everything out with Madison Street Beauty's Pistachio and used that to highlight my brow bone and inner corner.
On my cheecks is the ELF blush and bronzer duo in St. Lucia. On my lips is a Revlon Super Lustrous lipstick in Mocha Rose. This is a brownish red/pink shade. It looks like a really classic almost red lip to me, which I love. I thought it went well with the hair and was a good not overdone colour to go with my bright eyes.
Well, that's it for the shamrock filled look. Sorry that it is coming late! What did you wear for St. Patrick's Day?
I did my hair too! I took the front part and made it into a pouf type thing and pulled the sides back too. I did it by twisting the front section backwards and then pushing it forward a bit, then securing it with two bobby pins. I then pulled the side parts, by my ears, all the way to the back of my head and pinned that all with 3 bobby pins. I'm sorry for that ridiculous explanation, but I don't do hair, so I don't know how else to explain it!


On my cheecks is the ELF blush and bronzer duo in St. Lucia. On my lips is a Revlon Super Lustrous lipstick in Mocha Rose. This is a brownish red/pink shade. It looks like a really classic almost red lip to me, which I love. I thought it went well with the hair and was a good not overdone colour to go with my bright eyes.
Well, that's it for the shamrock filled look. Sorry that it is coming late! What did you wear for St. Patrick's Day?
Mar 16, 2014
Quick Look: Tropical St. Patrick's Day
Today's look was somewhat inspired by St. Patrick's Day, but is done with what I think are more summery tropical shades.


Sorry for the not great pictures. I actually did this look twice last night because the first time I sneezed while finishing my eyeliner. It smeared all over my eyes and I had to start over..... By the time I had finished the second time over I was kind of tired and grumpy so the pictures aren't great. Oh well.
For this look I used MUFE matte eyeshadow in #18 Tangerine. I blended this out with Madison Street Beauty's Butterscotch eyeshadow. On the lips is Muy Linda Collection's Mula lipstick. This isn't my favourite shade of lipstick but I thought it would be perfect for this!
That is it for the look. I hope you like it!
Mar 13, 2014
Quick Look: Creme de Couture Pinks
Today's look was done entirely with the Sigma Creme de Couture palette. I used all of the pink and purple shades in the palette.


 I went a bit overboard with the eyeliner, pulling it way out from my outer corner before curving it upwards. I blended some purple eyeshadow outwards on my bottom lashline too. I really like how it turned out, it became a fun cat eye!
On my lips is NYX Chloe lipstick and on my cheeks is my ELF blush and bronzer duo in St. Lucia. I don't really reach for pink very often, but I always really like how it ends up looking when I do!
That's it for today's look! If you have any questions, leave them in the comments below!


On my lips is NYX Chloe lipstick and on my cheeks is my ELF blush and bronzer duo in St. Lucia. I don't really reach for pink very often, but I always really like how it ends up looking when I do!
That's it for today's look! If you have any questions, leave them in the comments below!
Subscribe to:
Posts (Atom)